This guide is for LaserPost version 1.2
Using an older version? Guides for Laserpost v1.1 and Laserpost v1.0.
There are two flavors of LaserPost, one for LightBurn and the other for SVG (for importing shapes into most every laser program). One significant difference between the two, other than the file format, of course, is that LightBurn projects contain all layer settings so when those projects are opened, everything is ready to burn. SVG files, on the other hand, are organized by color and a setup sheet (<program-name>-setup.txt) is created that maps colors to laser settings.
As of version 1.2, LaserPost has two modes of operation: Standard and Advanced:
- Standard: Simple to use, and is recommended for most users (and is the default). When using LaserPost for Lightburn, it provides integration with LightBurn Material Libraries, making it simple to select existing materials to create laser-ready projects. Changes made to your LightBurn Material Library will be shared by all models.
- Advanced: extends Standard bywith advanced laser settings, using the CAM applications (e.g. Fusion 360) Tool Library to build out material libraries, and gives precise control over laser settings. This can be valuable, especially with larger projects and teams, as all laser settings are retained with your solid model for precise control and long term retention.
Throughout this guide, we will use Fusion 360 as our CAM program as it is by far the most popular, but the concept is the same (though the steps and screens somewhat different) for Inventory and HSMWorks.
LaserPost configuration
LaserPost is configured in multiple places, including on the machine setup, CAM setup, the individual cutting operations, and when doing the post-generation. This is accomplished using the Autodesk CAM post-processors ability to provide custom properties (as well as by redefining the purpose of some existing properties in Advanced mode). For this to work, you must have (and use) a machine definition that has the LaserPost post-processor selected (do not just select the post-processor when generating or many of these options will not be available).
To start using LaserPost, you must first install the LaserPost post-processor, and configure a machine that uses it with the settings you desire. While there are multiple ways to do this in Fusion 360, we recommend the following:
- Open your solid model in Fusion 360 and enter the Manufacture workspace
- On the Fabrication tab, in the Manage section, open your Machine Library
- Under "My Machines", click on "Cloud" (note: if you don't see cloud, enable it in your preferences), and then click the "+" button and choose "Cutting" to add a new laser machine.
- Name the machine "LaserPost for LightBurn" (or "LaserPost for SVG", and you can add both if you wish)
- Switch to the "Post Processing" tab, and to the right of the "Post" field click on the folder icon to import a post.
- On the new Post Library dialog click to import a post (the icon with the arrow pointing into a document), and browse to the ".CPS" file you downloaded for LaserPost and open it.
- Click Select to close the Post Library and return to the Machine Library, where you should now see a variety of LaserPost Machine options. Follow the section below on Machine Settings to configure your machine.
With this done, for all future models you simply need to do the following steps:
- On each Machining Setup, select your LaserPost machine, and set your WCS (Work Coordinate System) to match your laser's coordinate system (see below).
- On each Operation, use the Post Properties tab to configure your LaserPost options (see below).
- Run your post, and if desired change any options present in there (also see below).
Most properties are available in all flavors of LaserPost, but there are differences, and these are indicated below with the name of the product that supports the feature.
Machine Settings
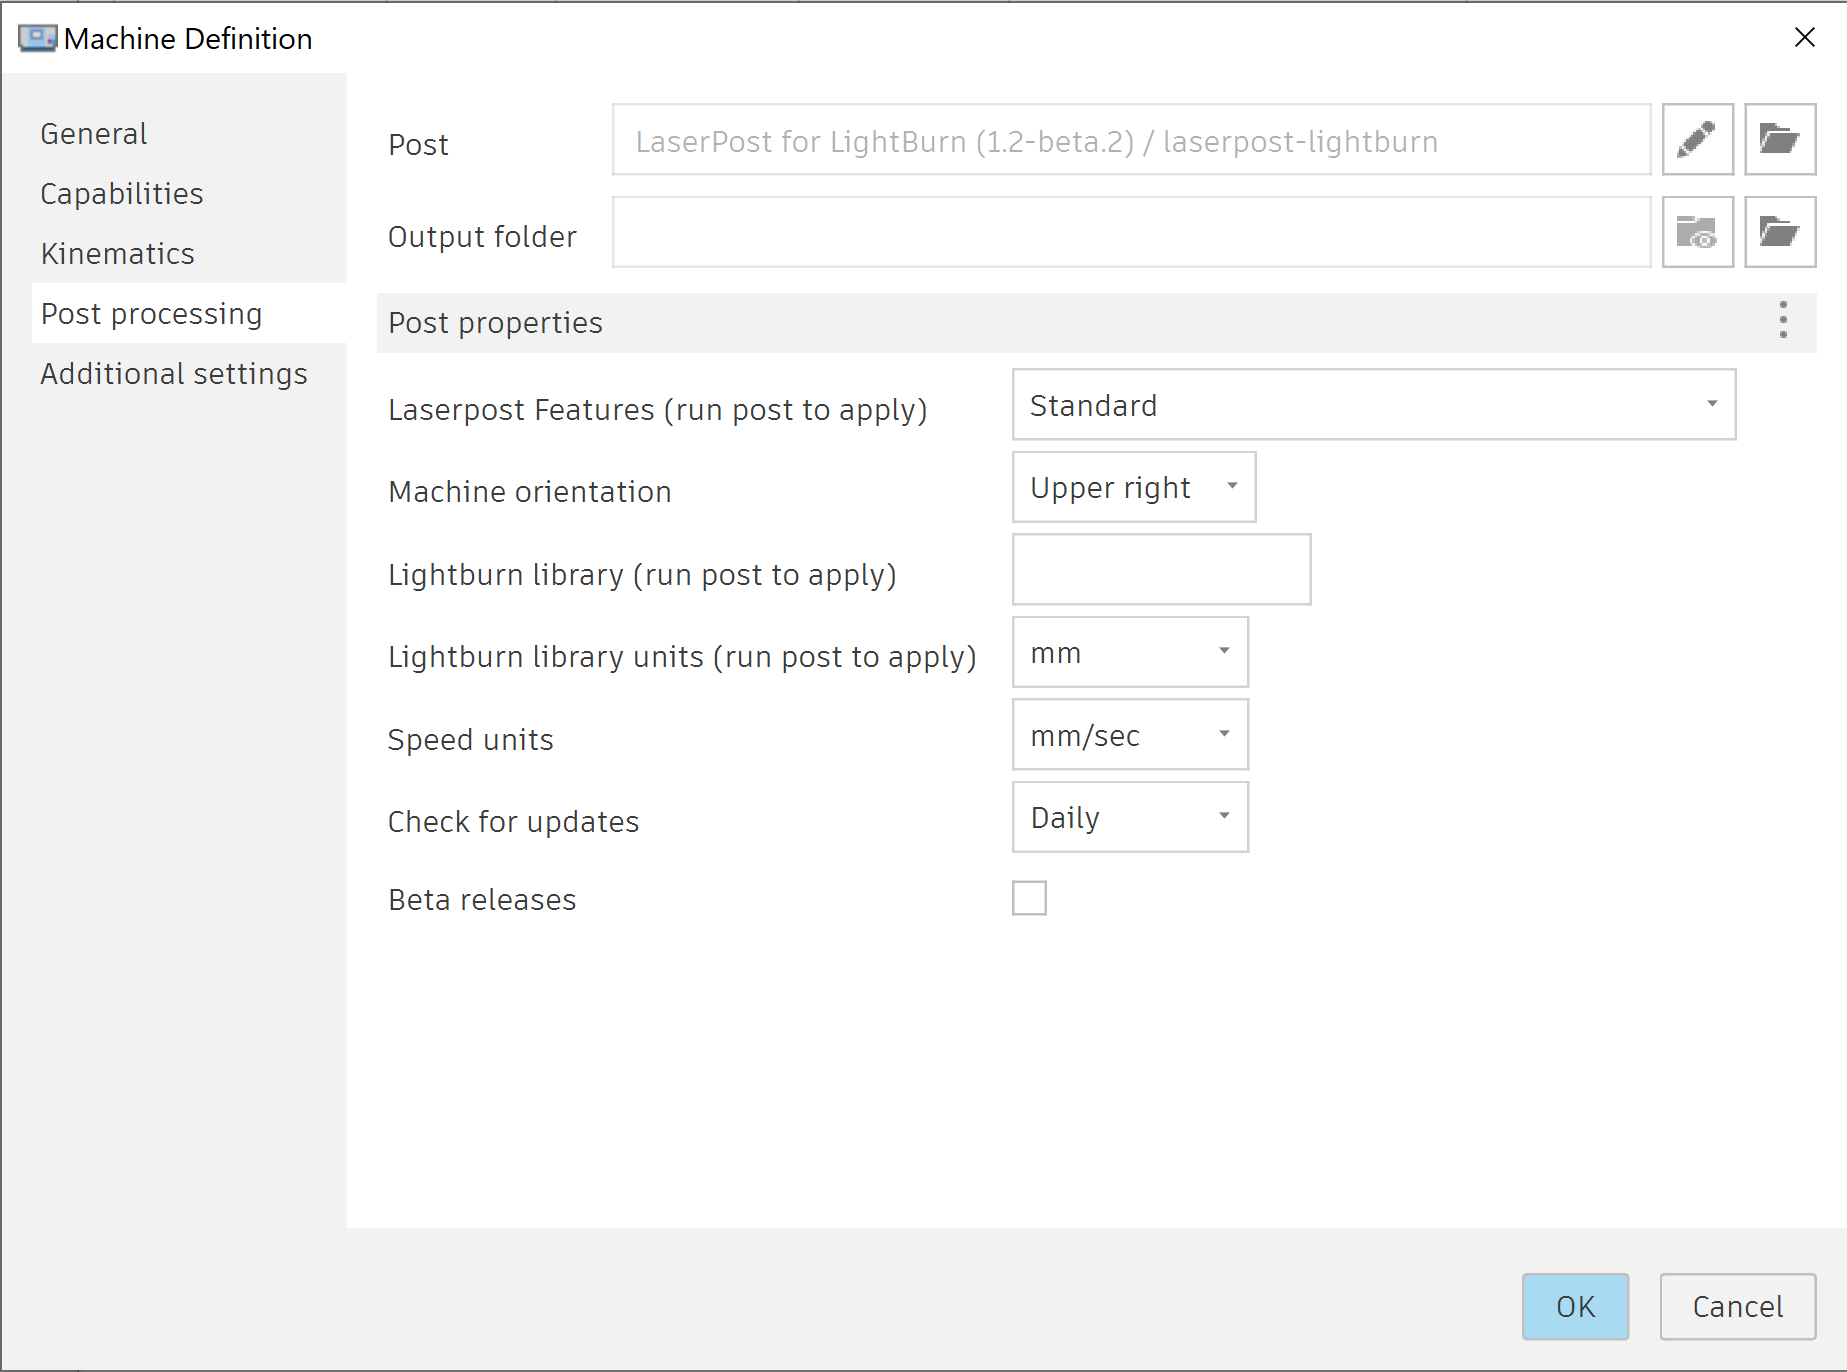
Standard LaserPost machine settings (click to enlarge).
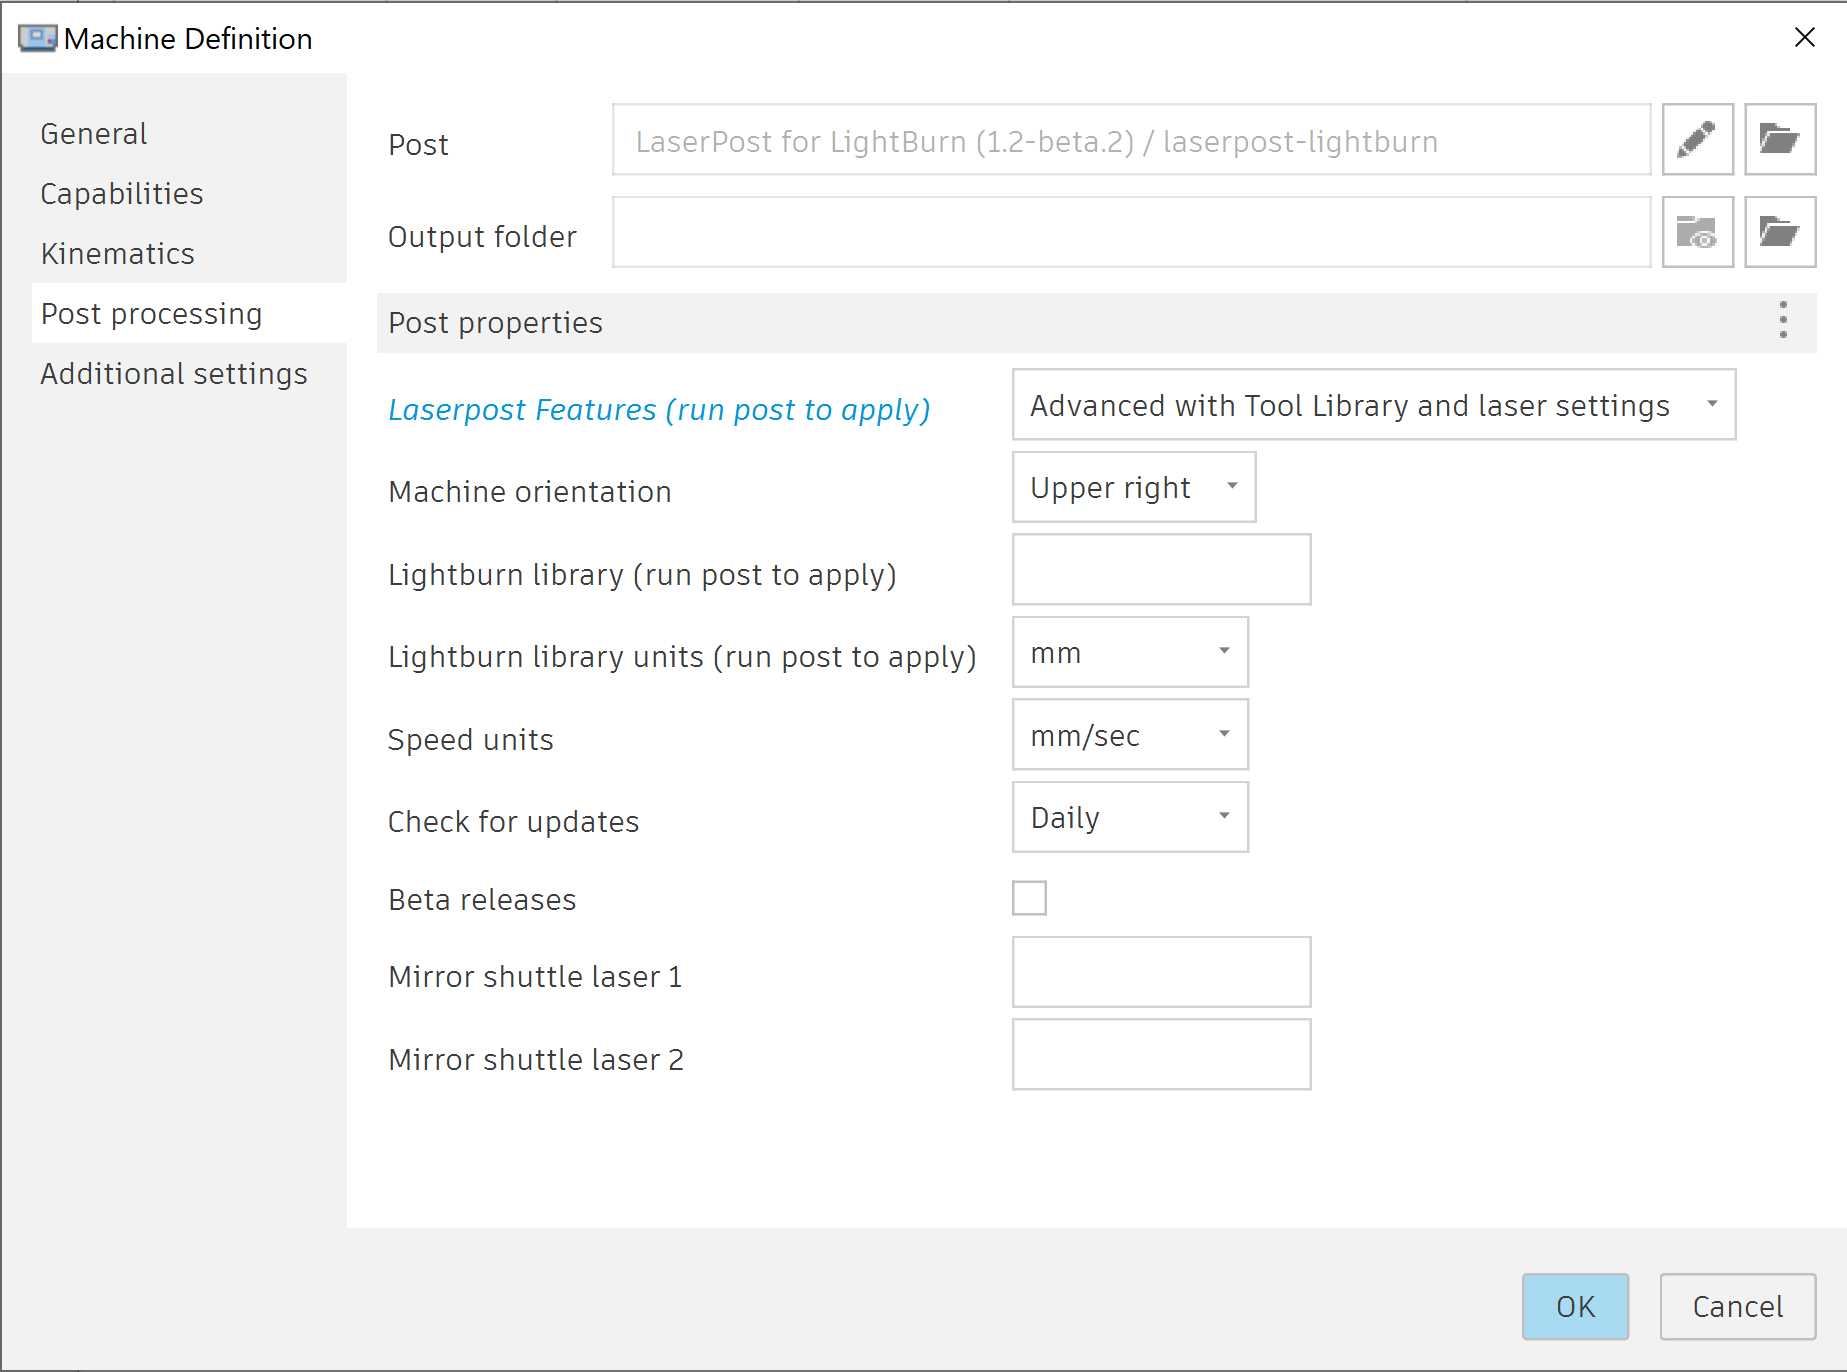
Advanced LaserPost machine settings (click to enlarge).
To open, right-click your setup to open properties, and on the Setup tab (default) click Edit for your Machine. If this is a installation, see installation steps above)
Machine settings are shared by all models, and have only a few features that rarely need adjustment. Access your machine settings by editing the CAM setup, under "Machine" click the "Edit..." button, and switch to the post-processing tab.
-
LaserPost Features: Choose from Standard (default) and Advanced modes. Note: You must run one post before the change will be available (because the Autodesk post-processor API is not informed of property changes until it is executed).
-
Machine orientation (LaserPost for LightBurn): LightBurn files need to know how to configure the machine orientation to match your laser cutter/engraver. Set this property to match how LightBurn machine properties are configured (Upper left, upper right, lower left, lower right).
-
LightBurn library (LaserPost for LightBurn): LightBurn material libraries can be directly integrated into Fusion 360, allowing for simply setup of laser settings on operations and for using a single material library across Fusion 360 and LightBurn. Changes made to the LightBurn library take affect immediately. You must specify the full path to the library (e.g. "C:\Users\BobLaser\Documents\LightBurn\MyLaser"). To find the path, from the LightBurn Library tab, click on "Load" and the window that opens is likely at the directory that stores your libraries. Note: You must run one post before the change will be available (because the Autodesk post-processor API is not informed of property changes until it is executed).
-
LightBurn library units (LaserPost for LightBurn): By default, LaserPost will use metric units for thicknesses in the LightBurn material library. You can change it to use inches instead here. Note: You must run one post before the change will be available (because the Autodesk post-processor API is not informed of property changes until it is executed).
- SVG file units (LaserPost for SVG): By default, SVG files are generated using the standard "pixels" unit (which is 96 per inch). Most laser programs import this perfectly, but some use an incorrect scaling for pixels (XTools XCS uses 72), resulting in the import being the wrong size. This setting allows other units to be used, including "inch", "mm", and "point". If you are having a scaling problem with imports, or would like the generated SVG geometry to be in a specific unit, try changing this option.
-
Speed units: Selects if "mm/min" or "mm/sec" should be the unit of speed measurement. This option only affects comments and notes and does not change any actual lasering or shape behavior.
-
Check for updates: Sets a schedule for how often LaserPost will check for updated versions being available. Checking is only done when generating a LaserPost project. Updates are never automatically installed, and when updates are available a message will appear during a post and will also be included as "important" notes.
-
Beta releases: By default, update notifications only include official release versions. Enable this to also be notified of Beta and Release Candidate releases.
- Mirror shuttle 1 (LaserPost for LightBurn): Some dual-laser cutters use a motor on the "U" axis to slide a mirror in the laser path to switch between the lasers (for example, for a higher-power cutting laser and a lower-power etching laser). This option sets the value the U axis should be set to when laser 1 is used.
-
Mirror shuttle 2 (LaserPost for LightBurn): Same as Mirror shuttle 1, except for when laser 2 is used.
Tool Cutting Data Settings
Tool cutting properties are not used with Standard mode.

Tool cutting data settings (click to enlarge).
Open the Fusion 360 Tool Library, select the tool library, and then select your tool. Click the pencil icon to edit, and then switch to the Cutting Data tab.
Tool cutting properties with LaserPost are used to define a material library, allowing for material-specific power, speed, and air-assist settings to be defined. Many fields are ignored, with the following fields being the ones used by LaserPost:
Cutting feedrate: This is the speed that the machine will use, in "mm/min". To use "mm/sec", simply enter the value using a formula such as "35 * 60" (35 mm per second, times 60 seconds = 2100 mm/minute).
Cut power: This is the power level to use for the laser and is expressed as a percentage (0-100%). This is the "max" power setting for lasers that use min/max values (such as CO2 lasers).
Pierce power: This field specifies the "min" power setting (also expressed as a percentage, 0-100%). Currently, Autodesk does not offer custom tool properties in CAM post-processor API so we override this field. While using this field is not obvious, at least it works!
Assist gas: Determines the default use of an air-assist feature when using this tool. This can be overridden on individual cutting operations (see below). Recommended values are "on" for enabling air-assist, and "off" for disabling (though any value can be used, where "off" or "none" will disable air-assist and otherwise it will be enabled).
CAM Setup Job Settings

Fusion 360 CAM Setup (click to enlarge).
Select the job setup in the CAM browser tree, right-mouse click, and select "Edit".
Each model must have one (or more) CAM setups that contain cutting operations. There are no custom LaserPost properties on this window, but the following setup details are important for the successful use of LaserPost:
Machine: You must set up a machine that is configured to use the LaserPost post-processor, and the setup must select that machine. If this is skipped, custom properties in the 2D Profile Cutting Operation will not be available.
Work Coordinate System (WCS) section: The fields in this section are used to set the orientation of your CAM operations relative to the stock, and to set a point that defines what will become the lower-left corner of the shapes when loaded in your laser program.
Use the orientation dropdown to select an orientation method, and follow the options to select a stock point. You must have the final WCS coordinate show the Z arrow pointing up (toward the laser head), and the X and Y arrows pointing toward the stock (not away from it).
Tip: If you are having difficulty getting X, Y, and Z arrows pointing in the correct direction, try the "Select Z axis/plane & X axis" option. Then select your Z (the depth), and then a horizontal line for X. This approach locks Z on the correct axis, and by adjusting Flip X and Flip Z you can get any corner to work.
2D Profile Cutting Operation Settings
All LaserPost shapes are defined using the "2D Profile" cutting operations (including for cutting and engraving tasks) where you select the geometry of your model. While you can have a single operation for large jobs (that share the same settings), it is recommended to use multiple, smaller operations (such as one to cut inside shapes, and another for an outside cut). This makes managing and understanding the operations easier, and results in more usable LightBurn groups.
The following three tabs are important to set up correctly.

2D Profile cutting operation (click to enlarge).
On any 2D Profile cutting operation, right-mouse click, select "Edit" and click the "Tool" tab.
The first tab is the Tool setting tab, where you select the tool (the base material), and set the cutting mode and preset that define how the operation will cut or engrave the material.
-
Tool: All operations require a tool. In Standard mode, you can almost any tool. For example, click Select..., and choose "Fusion 360 Library", then"Cutting Tools (metric)" and then "Laser Cutter".
In Advanced mode, this is where you start to define the precise laser setting you want this operation to use. With LaserPost for LightBurn, these settings will fully configured LightBurn. In SVG, these settings become part of an automatically generated setup sheet (a text file) that describes what settings to use for each color in the SVG file.
-
Tool: Select the tool from your Tool Library for the material type you are cutting. This will populate the "Preset" field to contain the various material settings available in your library.
-
Cutting Mode: This defines how the CAM system will generate the paths for the cutting operation. The "Through - auto" option is often used for cutting through the material and includes lead-in and lead-out operations (which energize the laser in scrap areas of the stock and move into the material to reduce scorching at high power). The "Etch" option should be used when doing etching, such as text and logos, and will energize the laser on the geometry (with no lead-in or lead-out). See the Post Properties tab's "Layer Mode" option (below) for how Cutting Mode may be used to set cut/fill modes (or overridden).
-
Preset: Selects the specific material settings from your tool/material library. This is where the laser settings such as power, speed, and air assist get defined.
-
Cutting Feedrate (optional): When you select a preset, the material (tool) library feedrate speed setting will be transferred to this field. You can further tune this value for this specific operation if desired.

2D Profile cutting operation (click to enlarge).
On any 2D Profile cutting operation, right-mouse click, select "Edit" and click the "Geometry" tab.
The Geometry tab is where you select the parts of your solid model (or sketch) you want to include in this operation. There are no LaserPost-specific settings.

Standard: 2D Profile cutting operation (click to enlarge).
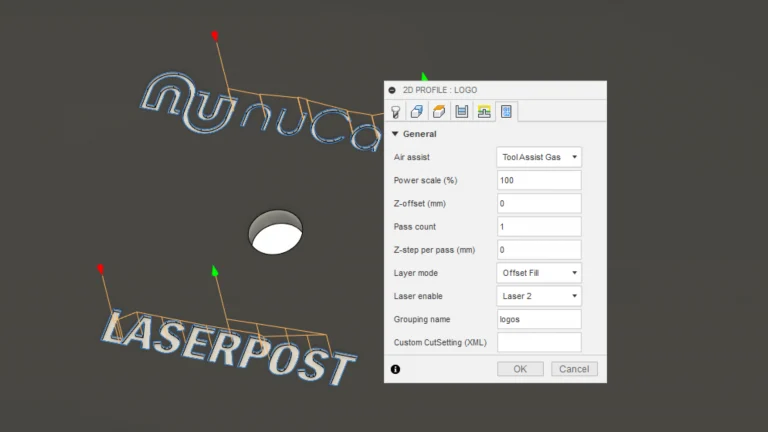
On any 2D Profile cutting operation, right-mouse click, select "Edit" and click the "Post Properties" tab.
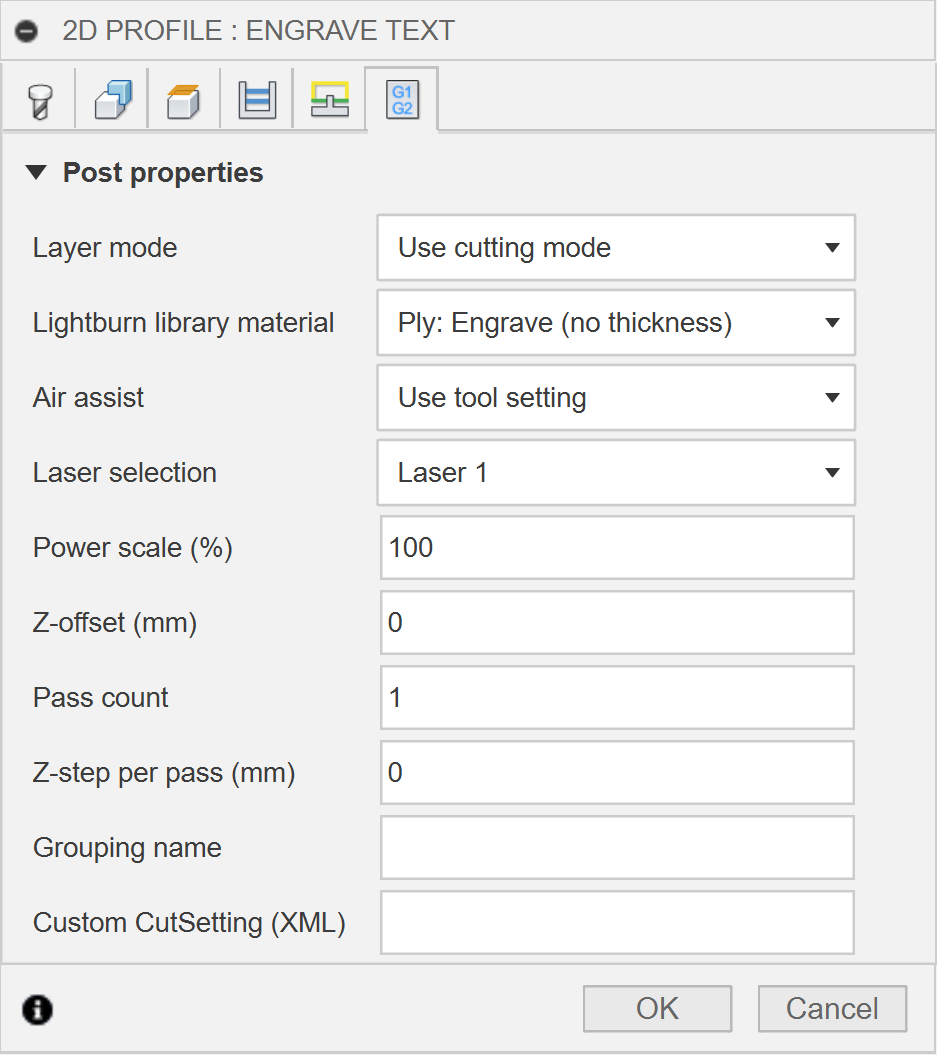
Advanced: 2D Profile cutting operation (click to enlarge).
On any 2D Profile cutting operation, right-mouse click, select "Edit" and click the "Post Properties" tab.
The post-properties tab on the 2D Profile cutting operation is where the connection from your operation to laser settings occurs. If this tab is not showing up, make sure your CAM setup (see above) has selected a machine that is configured to use the LaserPost post-processor.
-
LightBurn library material (LaserPost for LightBurn): If you have specified the path to a LightBurn material library, this dropdown will show all materials in the library. Simply choose a material and setting, and your laser configuration will be all set. Note: If you change your path or units for the library, available in Machine Settings, they will not be available until you run one post (because the Autodesk post-processor API is not informed of property changes until it is executed).
- Grouping name: For more precise control over the grouping of shapes in operations, this field can be given a name (such as "Logos"). All operations that share the same name will be automatically grouped (with their operation as a sub-group, unless disabled in post-property generation).
In Advanced mode, you have direct control over many laser settings. These are retained with your solid model, allowing for consistent, repeatable laser projects even when external libraries might change.
-
Layer mode: Sets type of vector/raster operation to use for this operation. Defaults to "Use Cutting Mode", where it will use a vector "Line" mode for Through and a raster "Fill" mode for Etch. You can also set the exact mode desired, including "Line", "Fill", or "Offset Fill".
-
Air assist: Determines if air assist will be used. The default, "Tool Assist Gas", will use the setting from the tool preset (Tool Library Cut Settings). You can also specifically disable air ("Off") or enable air ("On") for this operation.
-
Laser selection: For dual laser cutters, specifies which laser(s) should be used in this operation. Can also disable output while still keeping the shapes/layer. Options include "Disable output", "Laser 1" (default), "Laser 2", and "Both".
-
Power scale (%): Sets the "Power scale" to adjust the laser power.
-
Z-offset (mm): Sets how many millimeters (positive or negative) Z should be adjusted for this operation.
-
Pass count: Sets quantity of passes needed for the laser operation.
-
Z-step per pass (mm): Sets the distance to move Z on each pass (see "Pass count").
- Custom CutSetting (XML) (LaserPost for LightBurn): There are many options and features for setting layer properties in LightBurn, and including them all in LaserPost would make for a difficult-to-use experience. If you wish to use the more advanced features, such as using sub-layers, go to LightBurn and create the layer and save the project using the "LBRN (Legacy)" format. Open the project in a text editor and find the "<CutSettings>" for that layer, and copy the entire XML (including the "<CutSettings>" through "</CutSettings>") and paste that XML here. All other layer settings will be ignored when this option is used.
Post-processor Generate Settings
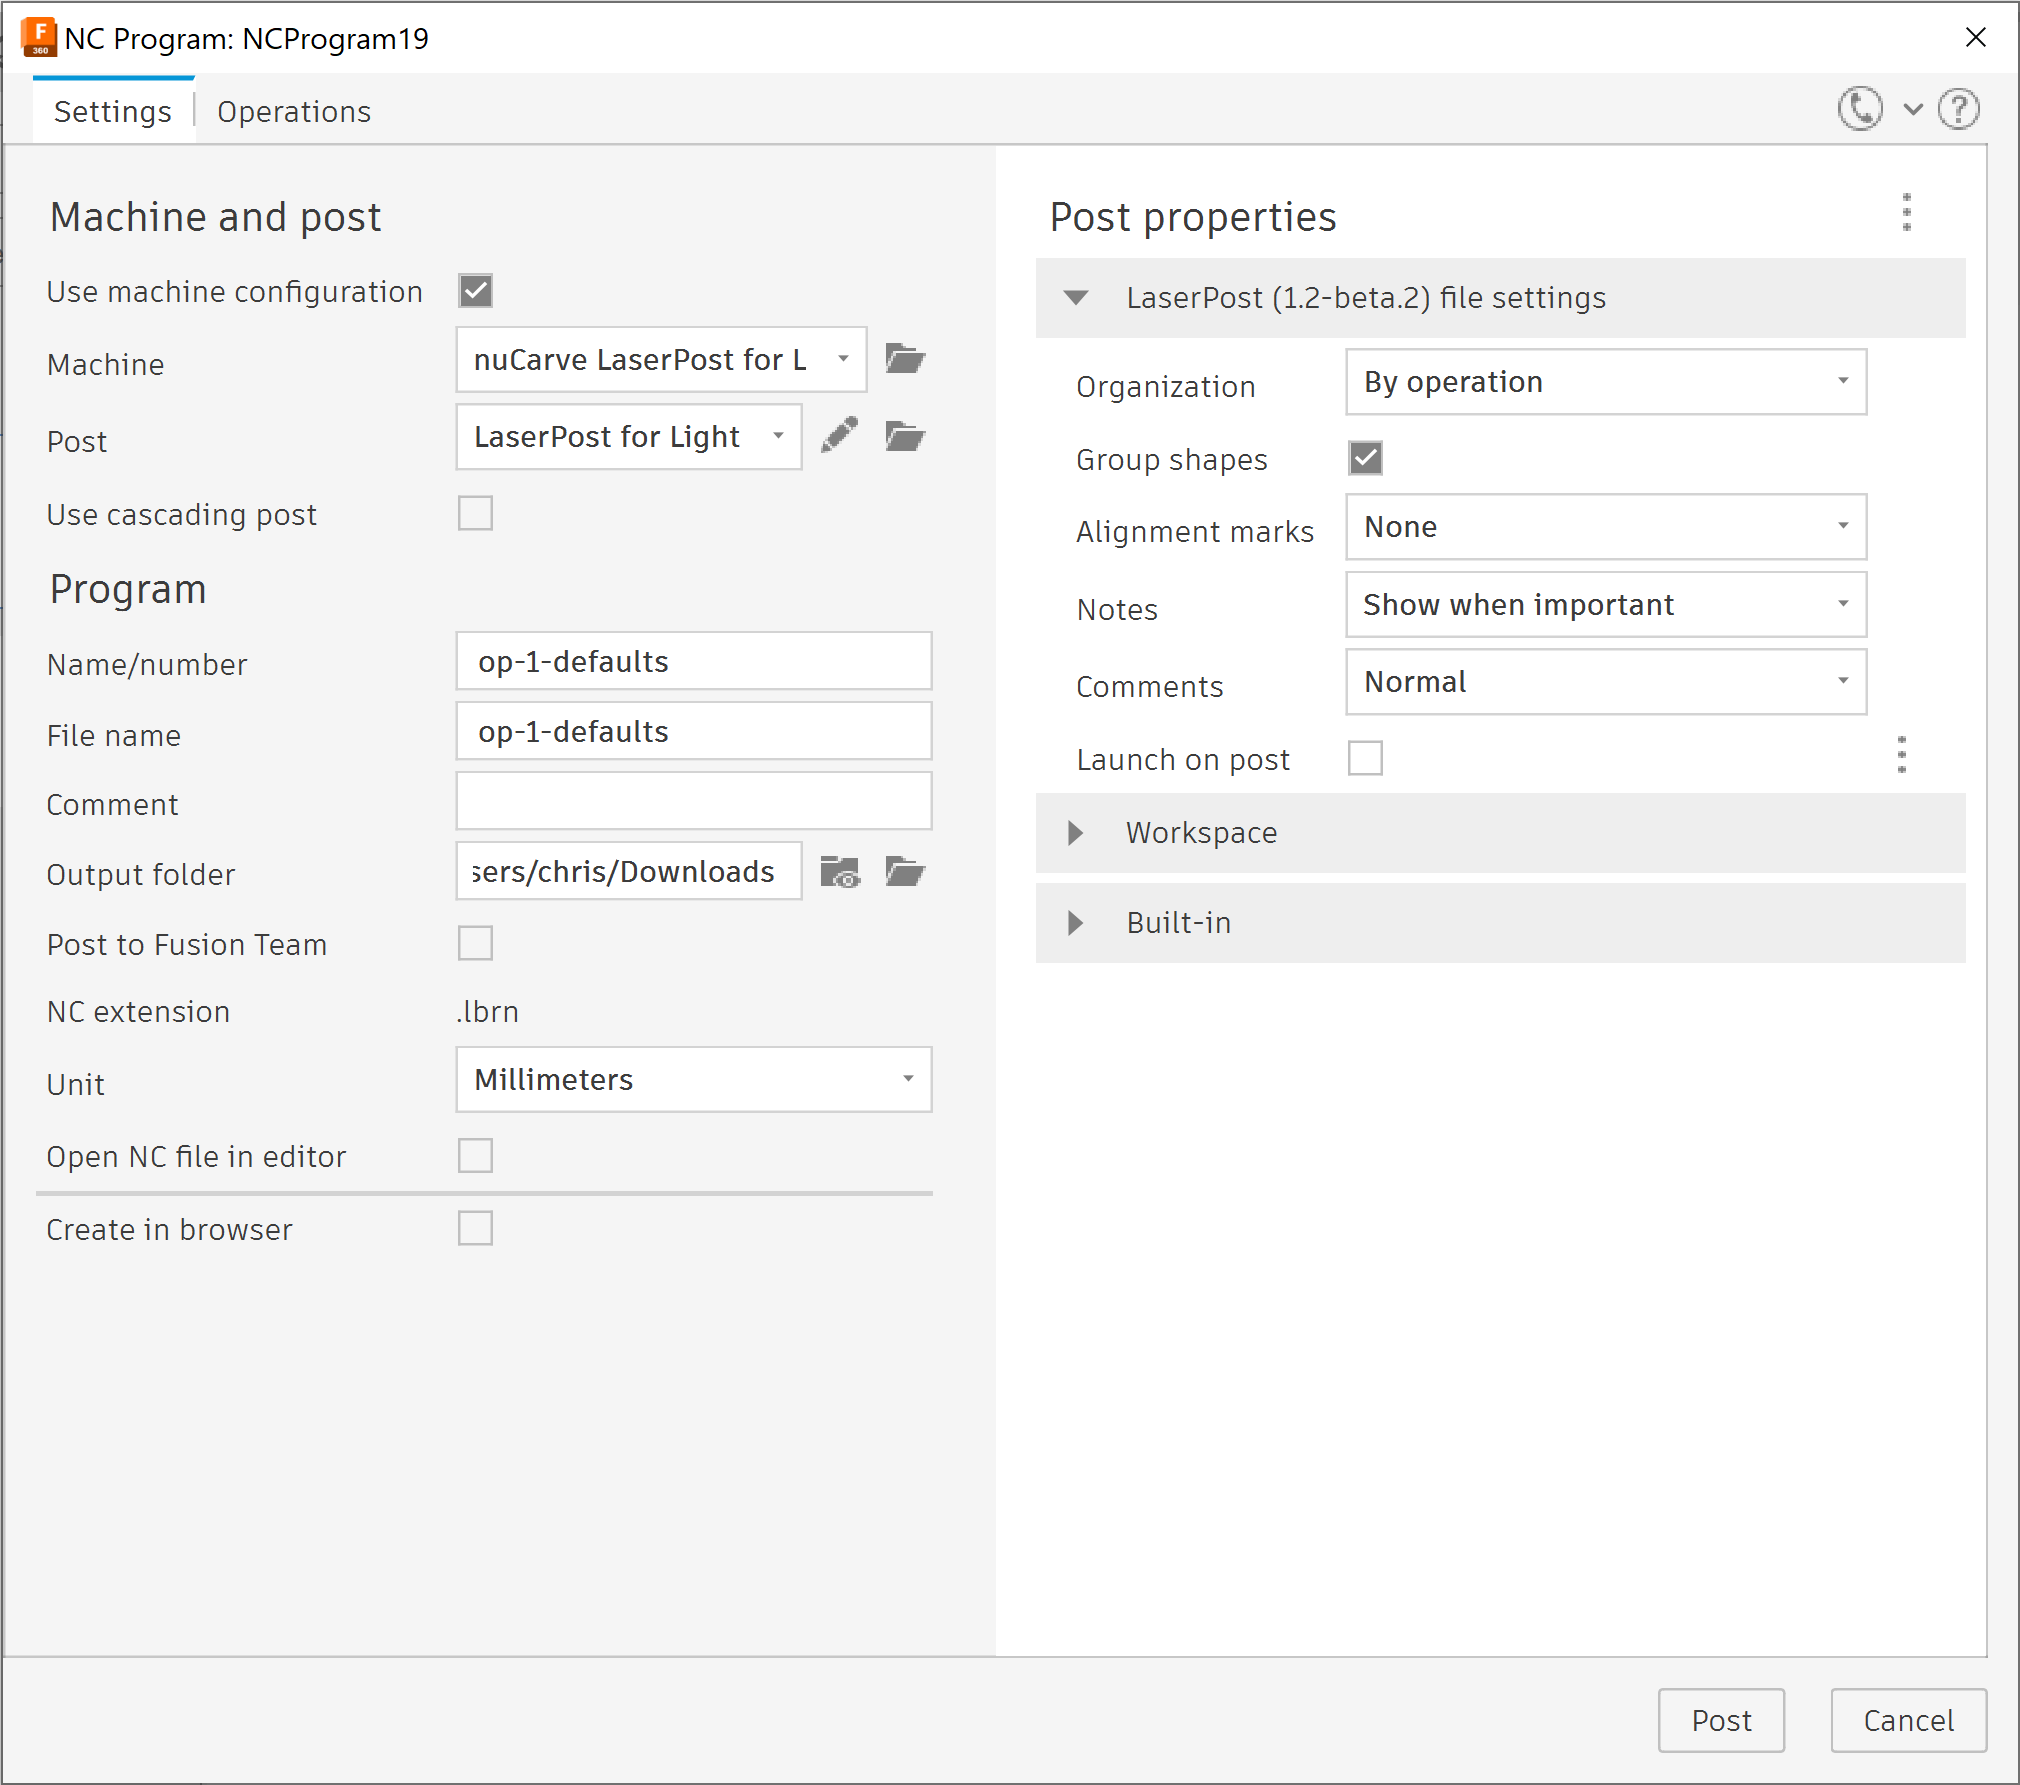
Standard: LaserPost post-processor actions (click to enlarge).
On the Actions menu bar, select Generate to start the post-processor.
Advanced: LaserPost post-processor actions (click to enlarge).
On the Actions menu bar, select Generate to start the post-processor.
Several options are available when starting a LaserPost post-process (with the Actions / Post Process menu option). Unlike the other properties in LaserPost, Autodesk does not save these with the project but instead keeps them the same from project to project.
LaserPost file settings:
-
Organization: Instructs LaserPost on how to organize operations into layers and files. You can also select to group by operation (all shapes organized by the operation, including shared group name), by layer (multiple operations that share the same laser settings) in a single file ("By layer"), or generate each layer into a different file, where the first filename will be your post name, and the remainder will have "-1", "-2", etc. appended ("By file layer"). LaserPost for LightBurn defaults to "By operation" since layers are managed within LightBurn, and LaserPost for SVG defaults to "By layer" to help with selecting shapes that share the same laser settings.
-
Group shapes: This checkbox, default on, tells LaserPost that shapes found within a single operation should be grouped. If the operation contains only one shape, no group will be created even when this is enabled.
-
Alignment marks: LaserPost can add alignment marks (circles with a cross-hatch in the middle) on each layer created. These are useful when importing shapes (especially when using "Organization / By file layer") and manual alignment of the shapes are needed to have perfect positioning. By default, this is off (None), but can be set to the stock's upper-right, center-right or lower-right position.
-
Notes: Notes are automatically created that summarize the configuration and laser settings, as well as contain important information such as problems detected or updates to LaserPost being available. In LaserPost for LightBurn, these are placed into the LightBurn project where they will appear in LightBurn under the File / Show Notes menu option. In LaserPost for SVG, these are stored in a "<post>-setup.txt" file and are useful to to set up the mapping of SVG colors to laser settings. Options include "Disable" (not recommended), "Hidden" (in LightBurn, doesn't show notes but they can be shown with File / Show Notes; in SVG the file is generated but no popup window appears saying it has been created), "Show when important" (auto-opens in LightBurn or displays a message when posting with SVG), or "Always show".
-
Comments: LaserPost injects helpful comments into the generated file(s). These comments do not affect the operation of the project but can be useful when looking at the project's XML. Options include "Disable", "Normal" (default), "Debug" (useful when trying to understand how LaserPost is working), and "Insane" (rarely needed but occasionally needed to debug LaserPost issues).
-
Launch on post: When checked, the generated file will be automatically started (launched), streamlining the workflow from solid model to laser. This is similar to double-clicking the file, where the default associated application is launched (e.g. LightBurn, or your default SVG display/edit program).
Power overrides:
Power overrides are not used with Standard mode.
-
Etch power (min and max, %): Optionally override the power level of all "Etch" cutting mode operations.
-
Vaporize power (min and max, %): Optionally override the power level of all "Vaporize" cutting mode operations.
-
Through power (min and max, %): Optionally override the power level of all "Through" cutting mode operations.
Workspace:
-
Trace stock: When enabled, includes a layer and shape that outlines the edges of the stock in the generated file(s). This layer will have its output turned off in LaserPost for LightBurn, and will have the setup sheet indicate it should be off (or deleted) in LaserPost for SVG. Unselect the checkbox to disable this feature. The default is on for LaserPost for LightBurn and off for LaserPost for SVG.
- Offset X axis: Offsets all X positions in the generated file(s) by the specified number of millimeters. Similar to using the setup Stock Offset feature, but operates on all setups in the project.
-
Offset Y axis: Offsets all Y positions in the generated file(s) by the specified number of millimeters. Similar to using the setup Stock Offset feature, but operations on all setups in the project.
Help us improve LaserPost
Hopefully, this has been helpful to get the most out of LaserPost. If you find anything inaccurate or missing, wish we would add a feature, or find a bug, please let us know by opening an issue on GitHub or sending us a message. And please consider sharing LaserPost with your friends and colleagues or more broadly with videos and articles on social media.